# 📡 Fleet Control Console (Server)
🌍 *[Read in English](#english) | 🇮🇹 [Leggi in Italiano](#italiano)*
---
## 🇬🇧 English
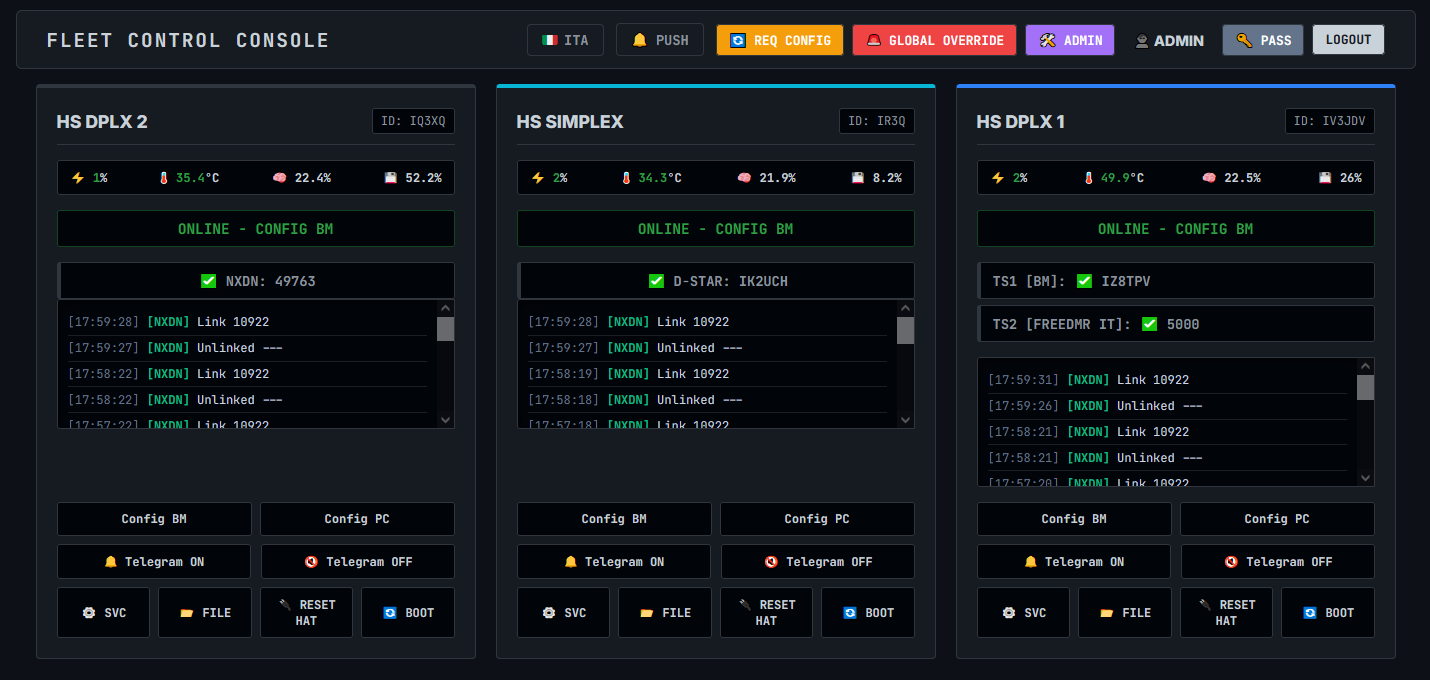
**Fleet Control Console** is a professional, real-time command and control (C2) dashboard designed for amateur radio repeater networks (MMDVM).
### 🤖 Remote Agent
To monitor your remote nodes (Raspberry Pi), download the dedicated lightweight agent here:
`https://git.arifvg.it/iv3jdv/web-console-agent.git`
### ✨ Features
* **Zero-Latency Real-Time UI:** Powered by WebSockets (Socket.IO).
* **Web Push Notifications:** Instant alerts on desktop or mobile.
* **Centralized Telemetry & Service Management.**
* **Global Operations:** Switch profiles instantly.
### 🚀 Installation & Setup
------------------------------------------------------------
1. PRE-REQUISITES (CRITICAL)
------------------------------------------------------------
Before installing Python dependencies, you must install
system compilers and development libraries.
Debian/Ubuntu:
sudo apt update
sudo apt install build-essential python3-dev libssl-dev libffi-dev
Upgrade base pip tools:
pip install --upgrade pip setuptools wheel
Create a virtual environment (Recommended):
python3 -m venv venv
source venv/bin/activate
pip install -r requirements.txt
------------------------------------------------------------
2. SERVER SETUP (CENTRAL HUB)
------------------------------------------------------------
The server handles the web interface and user permissions.
Steps:
1. Configure 'config.json' using 'config.example.json'.
2. Enter MQTT credentials and VAPID keys.
3. Define repeaters in the 'clients.json' file.
4. Install production WSGI server packages (if not in requirements):
pip install gunicorn gevent gevent-websocket
5. Start the production server:
gunicorn -k "geventwebsocket.gunicorn.workers.GeventWebSocketWorker" -w 1 --bind 0.0.0.0:9000 app:app
------------------------------------------------------------
3. GENERATING VAPID KEYS (PUSH NOTIFICATIONS)
------------------------------------------------------------
⚠️ WARNING: Web Push Notifications strictly require the
dashboard to be accessed via a secure HTTPS connection.
They will NOT work over standard HTTP.
1. Go to https://vapidkeys.com/ and generate the keys.
2. Copy 'Public Key' and 'Private Key' into 'config.json'.
3. Set 'vapid_claim_email' (e.g., "mailto:your@email.com").
------------------------------------------------------------
4. RUNNING AS A SERVICE (SYSTEMD)
------------------------------------------------------------
Configuration:
1. Copy .service file to '/etc/systemd/system/':
sudo cp fleet-console.service /etc/systemd/system/
2. Reload systemd: sudo systemctl daemon-reload
3. Enable on boot: sudo systemctl enable fleet-console
4. Start service: sudo systemctl start fleet-console
## 🇮🇹 Italiano
**Fleet Control Console** è una dashboard di comando e controllo (C2) professionale in tempo reale per le reti di ripetitori radioamatoriali (MMDVM).

### 🤖 Agente Remoto
Per monitorare i tuoi nodi remoti (Raspberry Pi), scarica l'agente dedicato qui:
`https://git.arifvg.it/iv3jdv/web-console-agent.git`
### ✨ Funzionalità
* **Interfaccia Real-Time a Latenza Zero** tramite WebSockets.
* **Notifiche Push Web** per allarmi critici.
* **Telemetria Centralizzata e Gestione Servizi.**
* **Operazioni Globali** su tutta la rete.
### 🚀 Installazione
------------------------------------------------------------
1. REQUISITI PRELIMINARI (CRITICI)
------------------------------------------------------------
Prima di installare le dipendenze Python, è necessario
installare i compilatori di sistema. Senza questi,
l'installazione di 'gevent' fallirà su VPS vergini.
Esegui su Debian/Ubuntu:
sudo apt update
sudo apt install build-essential python3-dev libssl-dev libffi-dev
Aggiorna gli strumenti di base di pip:
pip install --upgrade pip setuptools wheel
Crea un ambiente virtuale (consigliato):
python3 -m venv venv
source venv/bin/activate
pip install -r requirements.txt
------------------------------------------------------------
2. SETUP DEL SERVER
------------------------------------------------------------
Passaggi:
1. Configura 'config.json' partendo da 'config.example.json'.
2. Inserisci credenziali MQTT e chiavi VAPID.
3. Definisci i ripetitori in 'clients.json'.
4. Avvia il server di produzione:
gunicorn -k "geventwebsocket.gunicorn.workers.GeventWebSocketWorker" -w 1 --bind 0.0.0.0:9000 app:app
------------------------------------------------------------
3. GENERAZIONE CHIAVI VAPID
------------------------------------------------------------
⚠️ ATTENZIONE: Le notifiche push richiedono HTTPS.
1. Vai su https://vapidkeys.com/ e genera le chiavi.
2. Copia 'Public Key' e 'Private Key' nel 'config.json'.
3. Imposta 'vapid_claim_email' (es. "mailto:tua@email.com").
------------------------------------------------------------
4. ESECUZIONE COME SERVIZIO
------------------------------------------------------------
1. sudo cp fleet-console.service /etc/systemd/system/
2. sudo systemctl daemon-reload
3. sudo systemctl enable fleet-console
4. sudo systemctl start fleet-console
---
*Created by IV3JDV @ ARIFVG - 2026*